Quick Start Guide
Overview
Integrating Churnkey Cancel Flows into your application involves three main steps:
- Load the Churnkey script - Add the Churnkey JavaScript library to your website to make
window.churnkeyavailable - Generate secure authentication - Create a backend endpoint that generates an HMAC hash to verify customer identity
- Initialize the cancel flow - When a customer clicks cancel, fetch the authHash from your backend and display the Churnkey modal
This integration pattern ensures that only authenticated customers can access their cancellation options, protecting your application from unauthorized access.
Step One: Place Script Element
The following code will pull in the Churnkey client-side module and add it under the window.churnkey namespace so that you can later initialize the Churnkey Cancel Flow for your customers. Place it in the HTML <head> element.
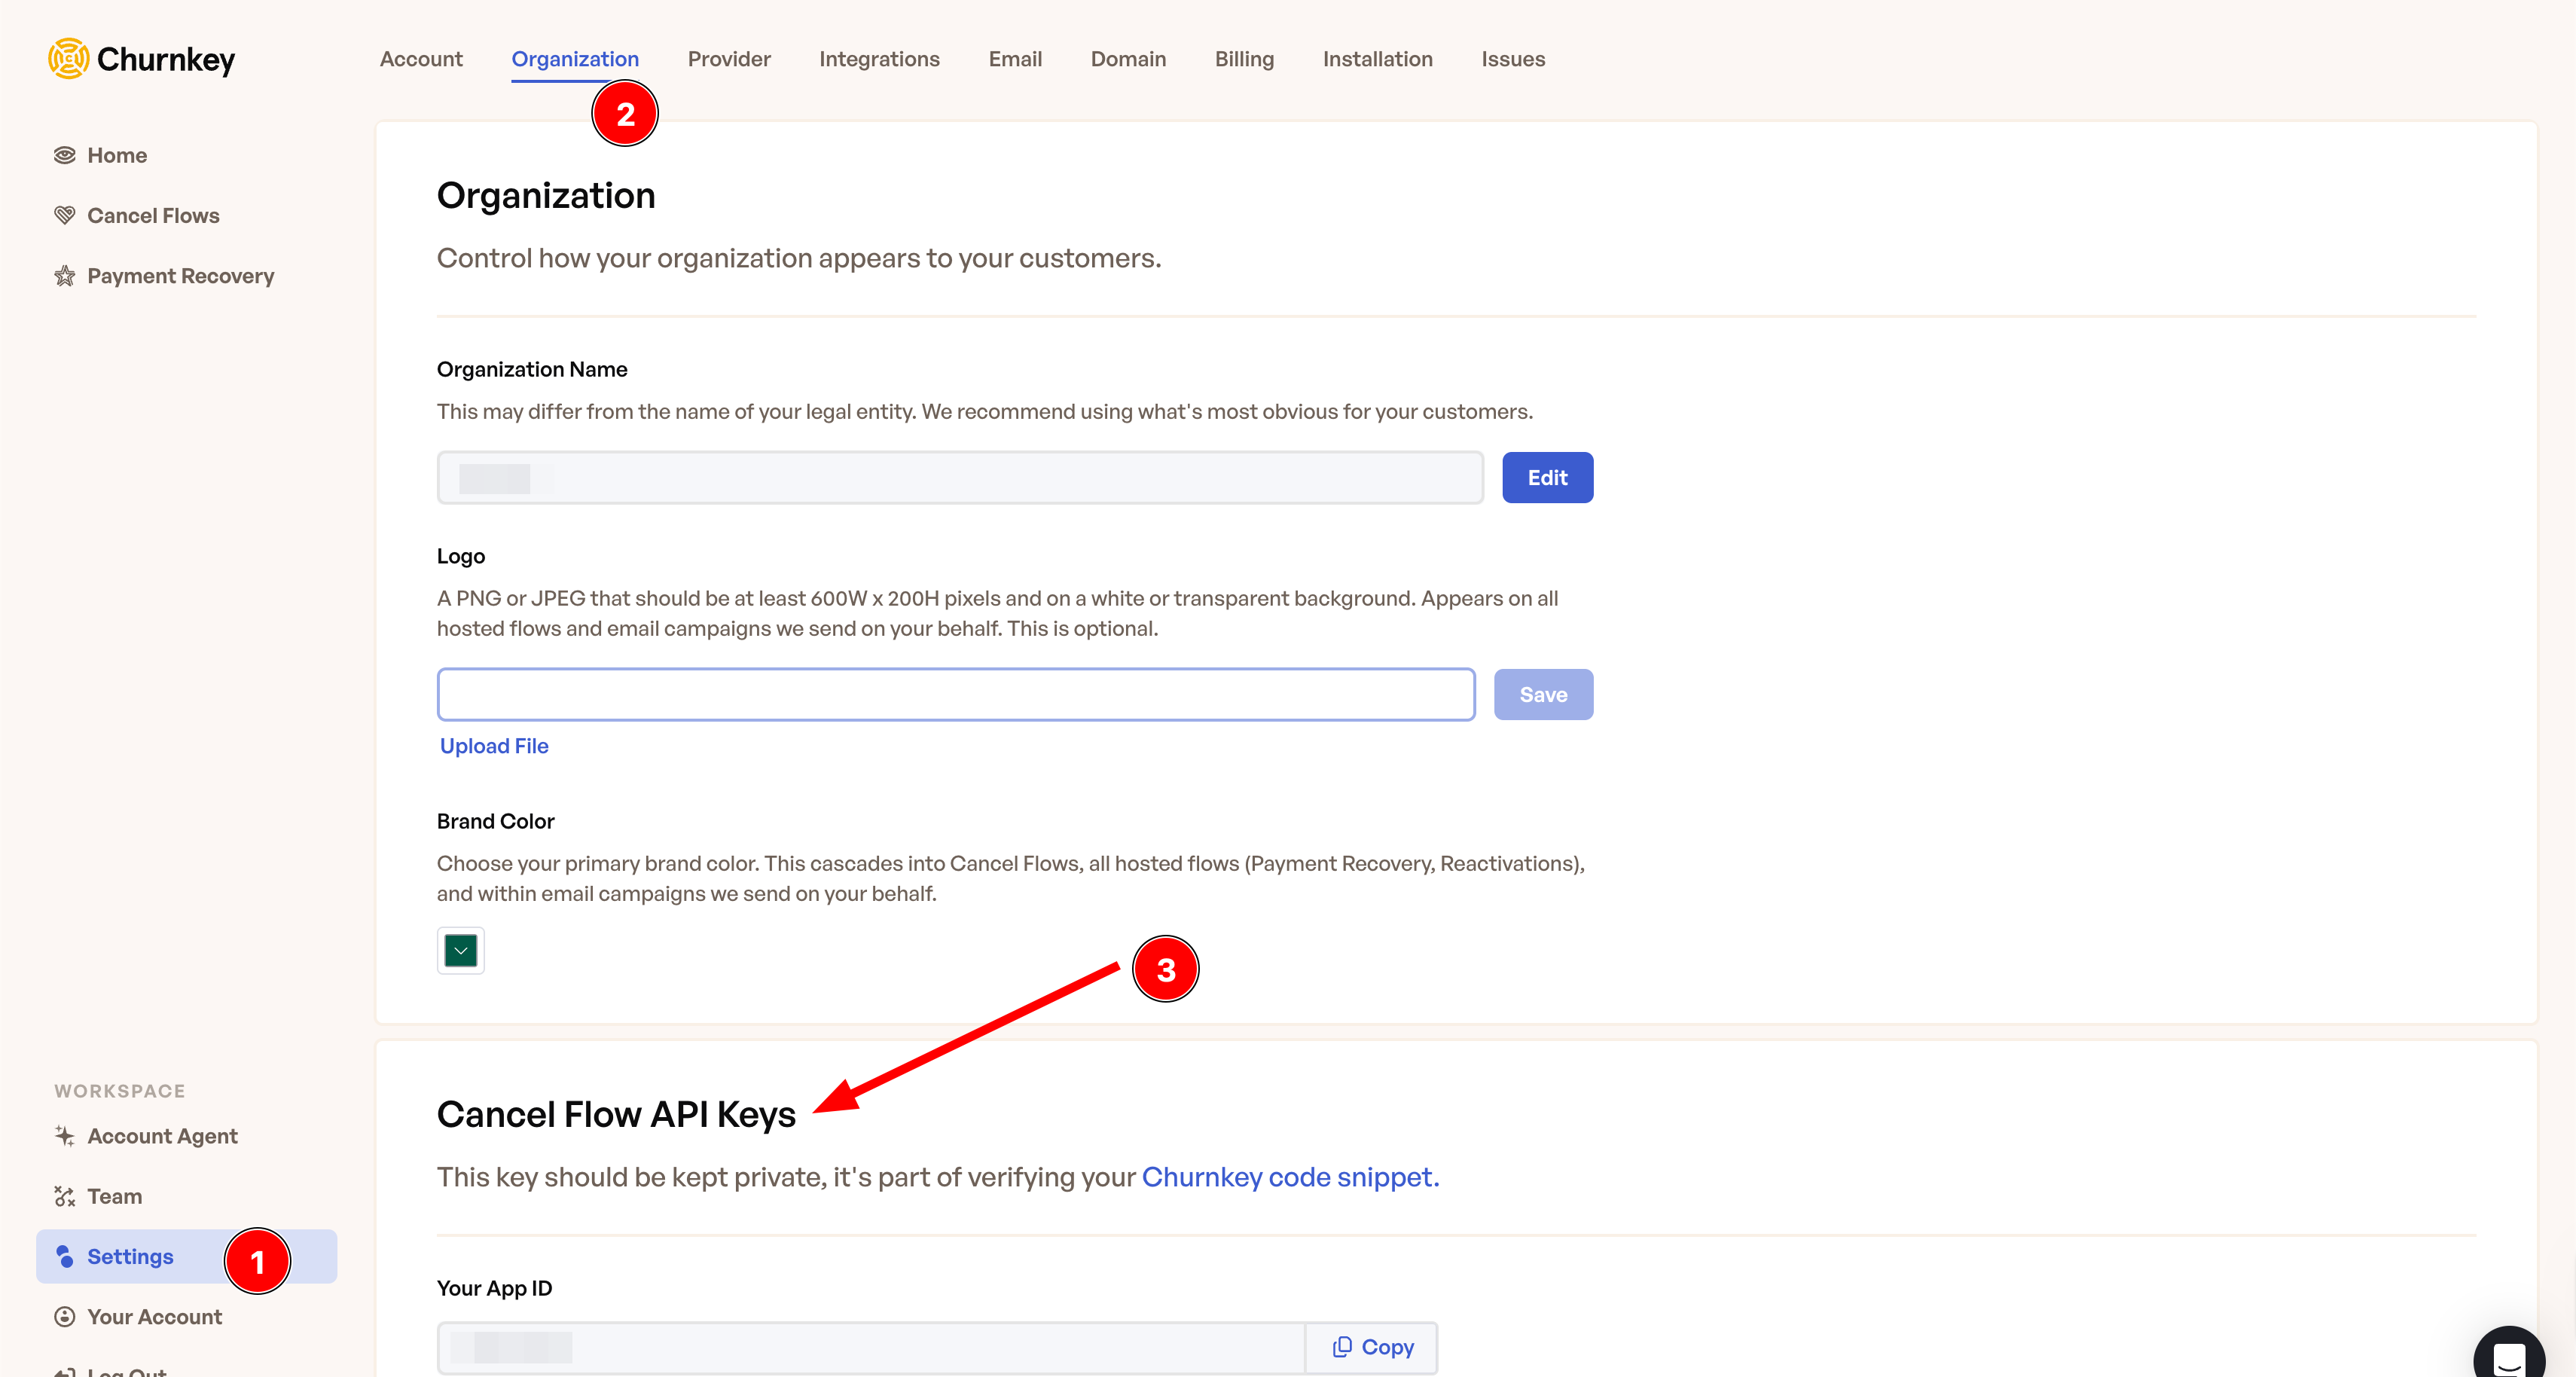
To find YOUR_APP_ID,from any initial page in Churnkey's dashboard you can navigate:
- Settings (Bottom Left Corner)
- Organization (Top Menu)
- Scroll Down to the section Cancel Flow API Keys
<script>
!function(){
  if (!window.churnkey || !window.churnkey.created) {
    window.churnkey = { created: true };
    const a = document.createElement('script');
    a.src = 'https://assets.churnkey.co/js/app.js?appId=YOUR_APP_ID';
    a.async = true;
    const b = document.getElementsByTagName('script')[0];
    b.parentNode.insertBefore(a, b);
  }
}();
</script>
Step Two: Generate Secure HMAC Hash
To ensure that all customer requests processed by Churnkey are authorized, server-side verification is implemented. This involves generating an HMAC hash on the customer ID (or subscription ID for Paddle users) using SHA-256 hashing. Before triggering the Churnkey flow, a request is sent to the server to (a) validate the request's authenticity, typically using existing authorization measures, and (b) compute the customer's ID hash. Below are examples in various backend languages.
To find your API_KEY, from any initial page in Churnkey's dashboard you can navigate:
- Settings (Bottom Left Corner)
- Organization (Top Menu)
- Scroll Down to the section Cancel Flow API Keys
const crypto = require("crypto");
const userHash = crypto.createHmac(
  "sha256",
  API_KEY // Your Churnkey API Key (keep this safe)
).update(CUSTOMER_ID).digest("hex"); // Send to front-end
Step Three: Launch Churnkey
Once the HMAC hash has been generated, you can initialize and display the Churnkey Cancel Flow by calling window.churnkey.init('show') with the required configuration parameters.
window.churnkey.init('show', {
  customerId: 'CUSTOMER_ID', // required unless Paddle
  authHash: 'HMAC_HASH', // required - fetched from your backend
  subscriptionId: 'SUBSCRIPTION_ID', // recommended unless Paddle
  appId: 'YOUR_APP_ID', // required
  mode: 'live', // set to 'test' to hit test billing provider environment
  provider: 'stripe', // set to 'stripe', 'chargebee', 'braintree', 'paddle'
  record: true, // set to false to skip session playback recording
})
Complete Integration Example
In practice, you'll need to fetch the authHash from your backend before initializing Churnkey. Here's a complete example showing the full flow:
// When user clicks cancel button, fetch authHash from your backend
document.getElementById('cancel-button').addEventListener('click', async function () {
  try {
    // Step 1: Fetch the authHash from your backend
    const customerId = 'CUSTOMER_ID'; // Get from your logged-in user session

    const response = await fetch('/api/churnkey', {
      method: 'POST',
      headers: {
        'Content-Type': 'application/json',
      },
      body: JSON.stringify({
        customerId: customerId,
      }),
    });

    if (!response.ok) {
      console.error('Failed to fetch authHash');
      return;
    }

    const { userHash } = await response.json();

    // Step 2: Initialize and display Churnkey with the authHash
    window.churnkey.init('show', {
      customerId: customerId, // required unless Paddle
      authHash: userHash, // required - fetched from backend
      subscriptionId: 'SUBSCRIPTION_ID', // recommended unless Paddle
      appId: 'YOUR_APP_ID', // required
      mode: 'live', // set to 'test' to hit test billing provider environment
      provider: 'stripe', // set to 'stripe', 'chargebee', 'braintree', 'paddle'
      record: true, // set to false to skip session playback recording
    });
  } catch (error) {
    console.error('Error initializing Churnkey:', error);
  }
});
Framework-Specific Examples
import { useState } from 'react';

function CancelButton() {
  const [loading, setLoading] = useState(false);

  const handleCancel = async () => {
    setLoading(true);
    try {
      const customerId = user.customerId; // From your auth context

      const response = await fetch('/api/churnkey', {
        method: 'POST',
        headers: { 'Content-Type': 'application/json' },
        body: JSON.stringify({ customerId }),
      });

      const { userHash } = await response.json();

      window.churnkey.init('show', {
        customerId: customerId,
        authHash: userHash,
        subscriptionId: user.subscriptionId,
        appId: 'YOUR_APP_ID',
        mode: 'live',
        provider: 'stripe',
        record: true,
      });
    } catch (error) {
      console.error('Error:', error);
    } finally {
      setLoading(false);
    }
  };

  return (
    <button onClick={handleCancel} disabled={loading}>
      {loading ? 'Loading...' : 'Cancel Subscription'}
    </button>
  );
}
Troubleshooting Common Issues
HMAC Authentication Error: "Invalid authHash"
If you receive an authentication error when initializing Churnkey, this indicates that the HMAC hash generated by your backend doesn't match what Churnkey expects.
Verify your HMAC implementation
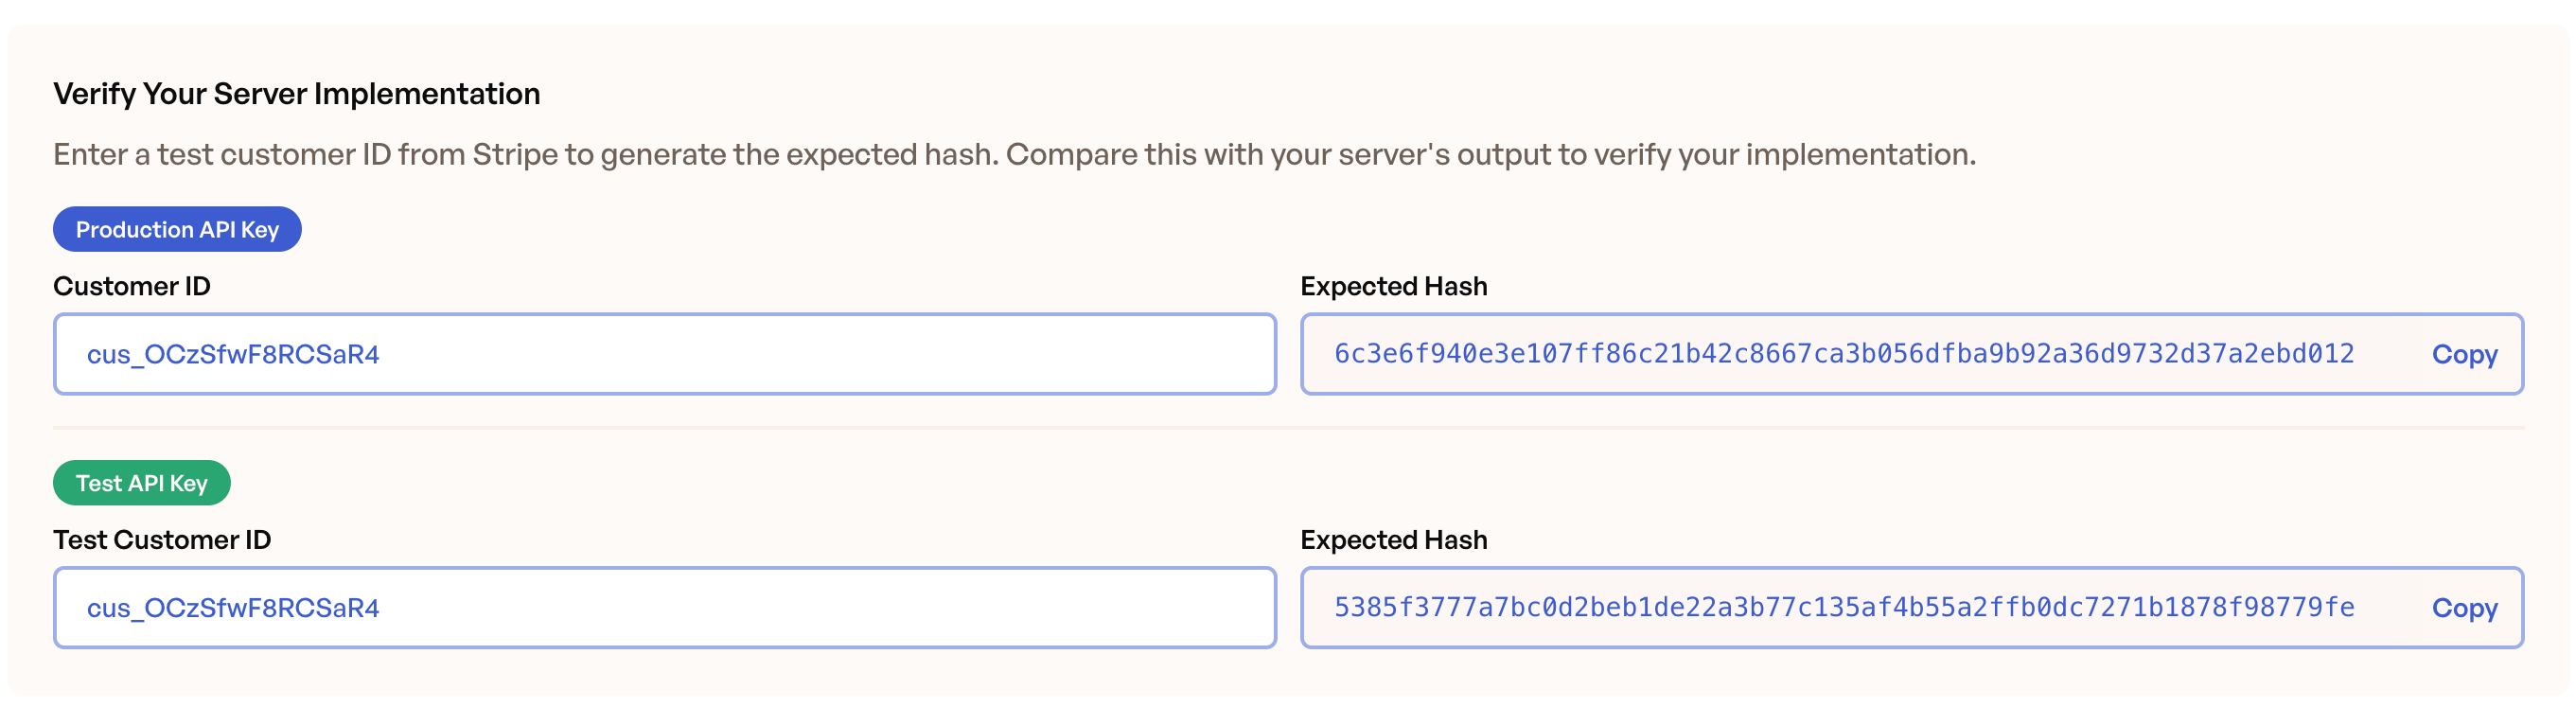
Churnkey provides an HMAC verification tool in the dashboard to help you debug authentication issues:
- Navigate to Settings (bottom left corner)
- Click Installation in the top menu
- Scroll down to the Verify Your Server Implementation section
- Select the Production API Key or Test API Key (depending on which environment you're testing)
- Enter the customerId in the input field
- Compare this hash with what your backend is producing
Common causes of HMAC mismatches:
- Extra whitespace: Make sure there are no leading or trailing spaces in your Customer ID or API Key when generating the hash.
- Encoding issues: The HMAC hash should be a hexadecimal string. Verify that your implementation uses
.digest("hex")or equivalent in your language. - API key mismatch: Ensure you're using the correct API key for your environment (Test API Key for test mode, Production API Key for live mode).
Cancel Flow Modal Not Displaying
If the Churnkey modal doesn't appear after clicking the cancel button, this is typically caused by a timing issue in server-side rendered (SSR) applications. The Churnkey script attempts to initialize before the page has fully hydrated, preventing the modal from rendering correctly.
What's happening:
When your application uses server-side rendering (Next.js, Nuxt, SvelteKit, etc.), the page goes through a hydration process where the server-rendered HTML is converted into an interactive client-side application. If the Churnkey script loads during this hydration phase, window.churnkey may not be fully initialized when you call window.churnkey.init('show'). While the API call succeeds, the modal interface fails to render.
Solution:
Ensure the Churnkey script loads after the page has completed hydration. In most modern frameworks, this means loading the script within a client-side lifecycle method or hook.
Framework-specific implementations:
import { useEffect } from 'react';

function App() {
  useEffect(() => {
    // Load Churnkey script after component mounts (hydration complete)
    if (!window.churnkey || !window.churnkey.created) {
      window.churnkey = { created: true };
      const script = document.createElement('script');
      script.src = 'https://assets.churnkey.co/js/app.js?appId=YOUR_APP_ID';
      script.async = true;
      document.head.appendChild(script);
    }
  }, []);

  return <div>{/* Your app content */}</div>;
}
Frequently Asked Questions
Why do I need to fetch the authHash every time?
The authHash must be fetched fresh each time a customer initiates cancellation. Never hardcode the authHash or cache it on the frontend, as this would compromise security. Fetching it from your backend ensures that:
- Each cancellation request is authenticated through your backend
- Only logged-in customers can generate valid authHash values
- The authHash is tied to the specific customer making the request